


Download Free Crane Study Material.
Come to Class Prepared!
Download free crane study material
Crane Certification, Study Material and Training School
OSHA Regulations
Final Rule
Small Telescopic Boom Crane
Brodersen RT300
Shuttlelift 7725
Manitex 1768
Large Telescopic Crane
Grove TMS750B
Link elt RTC-8050
Lattice Boom Truck Crane
Link Belt HC238H
Manitowoc 777
Lattice Boom Crawler Crane
American HC80
Manitowoc 888

Crane
A crane is a mechanical lifting device equipped with a winder, wire ropes and sheaves that can be used both to lift and lower materials and to move them horizontally. It uses one or more simple machines to create mechanical advantage and thus move loads beyond the normal capability of a human. Cranes are commonly employed in the transport industry for the loading and unloading of freight, in the construction industry for the movement of materials, and in the manufacturing industry for the assembling of heavy equipment.
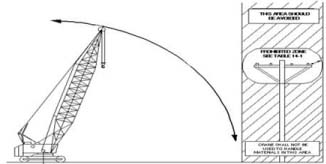
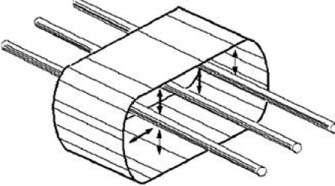
(See Figure 1). Any overhead wire shall be considered to be an energized line unless and until the owner of the line or the electrical utility authorities indicate that it is not an energized line. Do not rely on the coverings of wires for protection. Crane activities shall be conducted so that no part of the crane, load line or load becomes a conductive path. Cranes shall not be used to perform any lifting operations under power lines if any combination of boom, load, load line, or machine component has the capability of entering the prohibited zone or if the requirements of Crane Operations Within the Prohibited Zone and the Power Lines are Energized have not been met. Cranes should not be used to handle loads over power lines. The following four conditions must be considered when operating a Mobile Crane near electric power lines:
- Power lines de-energized and grounded as in Crane Operation Near De-energized and Grounded Electric Power Lines.
- Power lines energized, crane operating less than the erected/fully extended boom length away as in Power Lines Energized, Crane Operating Within the Erected/Fully Extended Boom Length of the Prohibited Zone.
- Power lines energized, crane within prohibited zone as in paragraph Crane Operations Within the Prohibited Zone and the Power Lines are Energized.
- Crane in transit, no boom and load lowered as in Crane in Transit With No Boom and Load Lowered.
Required Notification Before Work.A minimum of 48 hours before commencement of operations near electric power lines, notify the electrical utility for an onsite meeting to establish conditions to safely complete the operations. Prior to the beginning the work activity, notify electrical utilities in person or by phone, the day the work activity will take place to re-establish the location, equipment and working conditions.
Crane Operation Near De-energized and Grounded Electric Power Lines.This describes the preferred condition under which the operation can be performed safely. The hazard of injury or death due to electrocution has been removed. The following steps shall be taken to ensure that de-energization of the power lines has occurred:
- The power company or owner of the power lines shall de-energize the lines.
- The lines shall be visibly grounded to avoid electrical feedback and appropriately marked at the job-site location.
Figure 1. Operating Cranes Near Electrical Power Lines Not Within a Boom Length of Prohibited Zone. (Crane does not have the capacity to boom down, swing or extend into the prohibited zone.)
A qualified representative of the owner of the lines or a designated representative of the electrical utility shall be on site to verify that the steps above have been completed and that the lines are not energized.
If cage-type boom guards, insulating links, or other proximity warning devices are used on cranes, such devices shall not be used as a substitute for requirements of Operating Cranes Near Energized Transmitters or Electric Power Lines. If such devices are used, due to the lethal nature of electrical hazards and to lessen the potential of false security, the crane operator, crew, and load handling personnel shall receive instructions and have an understanding of:
- the electrical hazard involved
- operating conditions for the devices
- limitations of such devices
- testing requirements prescribed by the device manufacturer.
Power Lines Energized, Crane Operating Within the Erected/Fully Extended Boom Length of the Prohibited Zone (Crane has the capacity to boom down, swing or extend into the prohibited zone. See Figure 2.)
- An onsite meeting (see Required Notification Before Work) between project management and a qualified representative of the owner of the power lines or a designated representative of the electrical utility shall take place to establish the conditions to safely complete the operations.
- The specified clearance between the power lines and the crane, load line, and load shall be maintained at all times as specified in Table 1 and in Figure 3.
- Load control, when required, shall utilize tag lines of a nonconductive type. (A recommended choice for a nonconductive tag line is dry rope made of polypropylene or polyethylene fiber.)
- A qualified signaler, whose sole responsibility is to verify that the required clearance is maintained, shall be in constant contact with the crane operator.
- No one shall be permitted to touch the crane or the load unless the signaler indicates it is safe to do so.
- Operation of boom and load over electric power lines is extremely dangerous due to limited perception of distance and multiple contact points as viewed from the position of the operator and/or position of the signaler. The operator should avoid operating the crane, with or without a load, in this area.
- The horizontal and vertical distance of movement of long span lines due to the wind shall be added to the minimum clearance distance as specified in Table 1. A qualified representative of the owner of the power lines or a designated representative of the electrical utility shall be consulted for specific distances.
- A qualified person should attach devices such as ribbons, balls, etc., to the power lines to improve visibility, or equivalent means employed to aid in location of the Danger Zone.
- Notify electrical utilities by phone prior to the start of work on the first day of work, with the location, equipment to be used, and the conditions established prior to the onsite meeting.
- If cage-type boom guards, insulating links, or other proximity warning devices are used on cranes, such devices shall not be used as a substitute for requirements of Operating Cranes Near Energized Transmitters or Electric Power Lines. If such devices are used, due to the lethal nature of electrical hazards and to lessen the potential of false security, the crane operator, crew, and load handling personnel shall receive instructions and have an understanding of the following:
- the electrical hazard involved
- operating conditions for the devices
- limitations of such devices
- testing requirements prescribed by the device manufacturer
- the required clearances to electrical lines established in Table 1 shall be maintained regardless of any devices used on the crane.
Figure 2. Danger Zone for Cranes and Lifted Loads Operating Near Electrical Power Lines Within Boom Length of Prohibited Zone. (Crane has the capacity to boom down, swing or extend into the prohibited zone.)
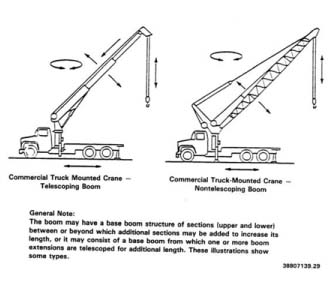
Table 1. Safe Working Distance from Power Lines
a. When operating near high-voltage power linesNormal voltage (phase to phase) |
Minimum Required Clearance |
Up to 50 kV |
10 ft (3.1 m) |
|
b. While in transit with no boom and load or mast lowered |
|
Normal voltage (phase to phase) |
Minimum Required Clearance |
Up to 0.75 kV |
4 ft (1.2 m) |
Figure 3. Minimum Radial Distance of Prohibited Zone for Cranes Operating Near Electrical Lines
Crane Operations Within the Prohibited Zone and the Power Lines are Energized
Before such operations take place, a qualified person responsible for crane operations and a qualified representative of the utility or an engineer qualified in power line transmission, after visiting the site together, shall determine whether operating the crane within the Prohibited Zone is the most feasible way to complete the job. Both persons shall set minimum required clearances and procedures for safe operations. These operations shall be under their supervision.
Before crane operations within the Prohibited Zone, the following may be required:
- crane/load grounding to a neutral line by the utility
- electrical system protective devices that automatically re-energize the circuit after a power line contact occurrence blocked or disengaged to inhibit this function
- insulated barriers, which are not a part of nor an attachment to the crane and which will not allow contact between the energized electric power lines and the crane, load lines, or load
- nonconductive barricades to restrict access to the crane work area.
Load control, when required, shall utilize tag lines of a nonconductive type. (A recommended choice for a nonconductive tag line is dry rope made of polypropylene or polyethylene fiber.)
A qualified signaler, whose sole responsibility is to verify that the established clearances are maintained, shall be in constant contact with the crane operator.
The person responsible for the operation shall alert and warn the crane operator and all persons working around or near the crane about hazard of electrocution or serious injury and instruct those persons on how to avoid the hazard.
All non-essential personnel shall be removed from the crane work area.
No one shall be permitted to touch the crane or the load unless the signaler indicates it is safe to do so.
If cage-type boom guards, insulating links, or other proximity warning devices are used on cranes, such devices shall not be used as a substitute for requirements of Operating Cranes Near Energized Transmitters or Electric Power Lines. If such devices are used, due to the lethal nature of electrical hazards and to lessen the potential of false security, the crane operator, crew, and load handling personnel shall receive instructions and have an understanding of the following:
- the electrical hazard involved
- operating conditions for the devices
- limitations of such devices
- testing requirements prescribed by the device manufacturer.
Crane in Transit With No Boom and Load Lowered
Perform the following tasks:
- Cranes in transit with no boom and load lowered shall maintain the minimum clearance as specified in Table 1(b).
- If during transit there is a reasonable possibility of getting near a power line, a person shall be assigned to observe the clearance and give warning before the crane approaches the minimum required clearance. It is important that this person not be distracted or assigned other duties while observing power line clearance.
- When planning transit of the crane, the effect of speed and terrain on the boom and crane movement shall be considered.
Hoisting and Rigging Bulletin May 29, 2003 Mobile Cranes and Energized Power Lines
Overhead electrical power lines are a serious electrocution hazard to mobile crane operators. This bulletin provides supplemental information on how to avoid serious injury in the event of accidental contact between mobile crane equipment and an energized overhead power line. Refer to Operating Cranes Near Energized Transmitters or Electric Power Lines in this PNNL Hoisting and Rigging Manual for specific safe practices and work planning requirements related to operating mobile cranes near energized transmitters or electrical power lines.
In the Event of a Power Line Contact or Arcing: Power line disturbances involving mobile cranes have the potential to result in serious injury. Generally, those at greatest risk are the riggers or other workers standing near the crane structure, accounting for approximately 70% of the injuries and deaths that occur. Operators are injured less frequently because of the physics of electricity and crane equipment design. If an event occurs, no current will flow through the operator as long as he/she stays on the crane. (With the operator on the crane, both the crane and the operator have the same voltage potential.)
If a line is contacted or arcing occurs as a result of inadequate clearance, the operator should move the unit away from the danger while carefully trying to disconnect from the line to remove any contact (if applicable). Movement away from the zone should be in the reverse direction and should continue until the arc breaks. An adequate distance is at least an additional 10 feet, with the actual distance depending on the electrical power line area of influence; for higher voltages greater distances are needed.
Backing away needs to be done cautiously because the power line may have "tack welded" to the crane component or load during contact. If contact with the energized line cannot be broken, the operator should STOP. The operator should wait in the crane cab and all other workers should stay away from the crane, ropes, and load, which, in addition to the ground surface, will be "hot." Electrical Utilities should be contacted to de-energize the line and confirm a safe condition before the operator attempts to leave the cab or other ground personnel approach the scene. ONLY UNDER EXTREME CIRCUMSTANCES (e.g., fire) should the operator leave the cab while the power line is still energized.
Should the line break and drop onto the crane, the operator needs to stop the crane, stay seated, shut off the engine and have Electrical Utilities immediately notified to respond. No movement of the crane shall occur until Electrical Utilities provides express authorization.
Emergency Crane Cab Evacuation: If the operator must leave the equipment, he or she should keep both feet together and jump clear from the equipment, maintain balance, and land with both feet still together. The operator’s hands should not touch any part of the crane equipment during the jump. Care must be taken not to touch any part of the crane and the ground at the same time. The operator must then shuffle his/her feet slowly and in very small steps or bunny hop away from the crane and the affected area. After a power line contact, the electrical current flows outward from the crane through the soil in a ripple pattern.
Areas of high and low potential circle the energized equipment like ripples in a pond after a stone hits the surface. If a person steps from an area of high potential to an area of low potential, electricity can flow through the person’s legs causing injury or death. The difference in potential when one foot is in a high-voltage area and the other foot is in a low-voltage area will cause electricity to pass through the body. The current flowing through the ground also is why other workers in the area must stay at least 10 feet away from the energized equipment.
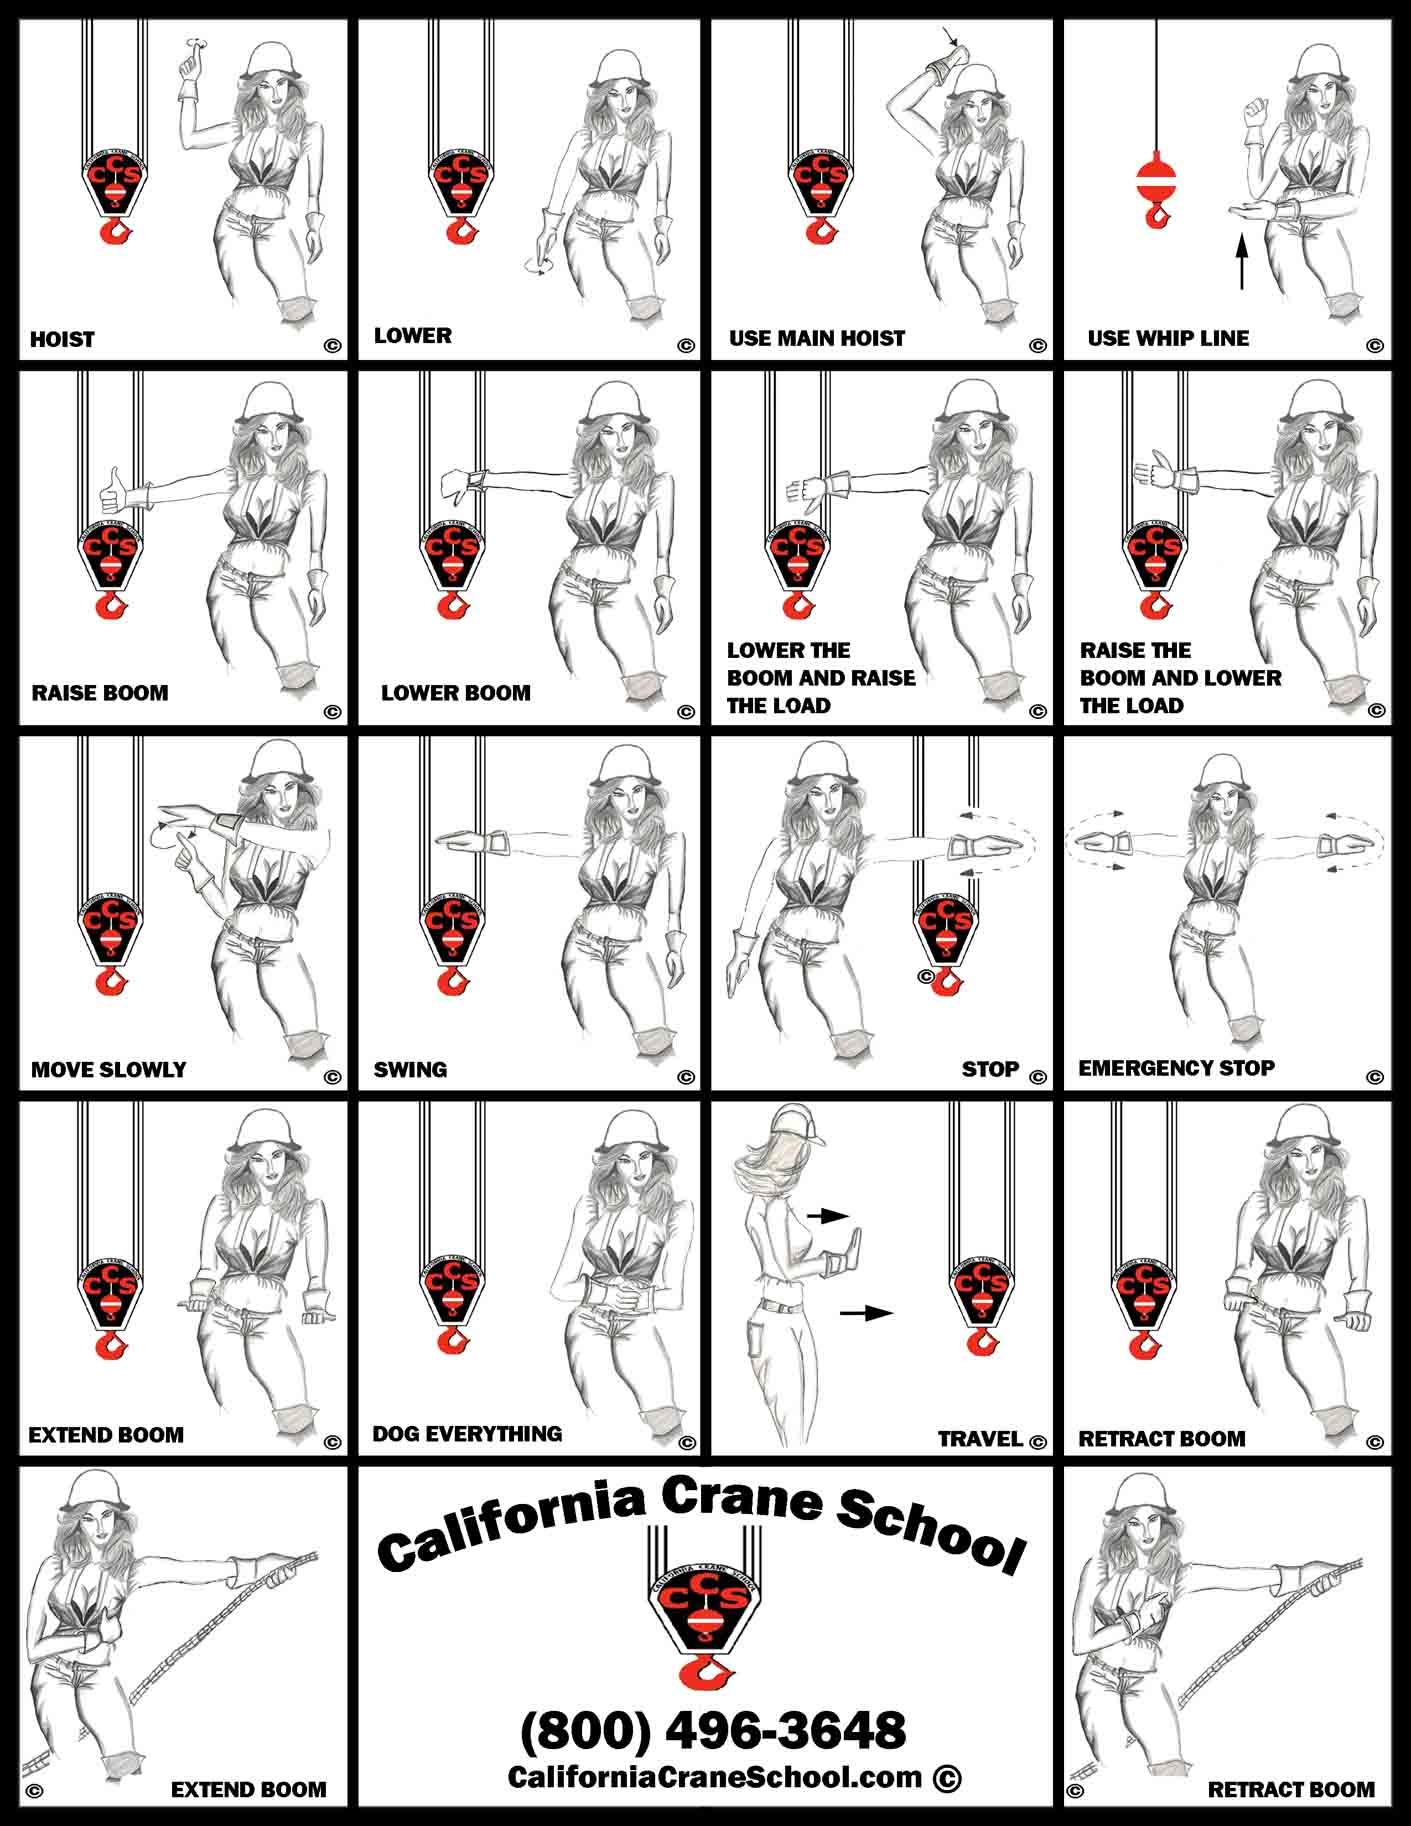
Signals and Instructions
Standard Signals. Standard hand signals are shown in Hand Signals. In situations where hand signals are not effective, use voice communication equipment (radio or hard wired). When using radio, it is important to have channels devoted exclusively to crane communications. Signals shall be discernible or audible.
Special Signals. For operations not covered by standard hand signals or for special operations, additions to or modifications of the standard signals may be required. In such cases, the special signals shall be agreed upon in advance by both the operator and the signal person, and should not conflict with standard signals.
Audible Travel Signals. When moving the vehicle, use the following signals:
- one audible signal—STOP.
- two audible signals—GO AHEAD.
- three audible signals—BACK UP.
Instructions. If it is desired to give instructions to the operator, other than those provided by the established signal system, the crane motions shall be stopped until instructions are given to and understood by the operator.
Fire Extinguisher. A portable fire extinguisher, with a minimum extinguisher rating of 10 BC, shall be installed in the cab or at the machinery housing. Operating and maintenance personnel shall be familiar with the use and care of the fire extinguisher. Maintain fire extinguishers in a serviceable condition.
Refueling. Engines shall be stopped before refueling, and smoking or open flames within 50 feet (15.2 meters) of the refueling area are prohibited. Portable containers for refueling with gasoline shall be safety-type cans equipped with an automatic closing cap and a flame arrester.
Information From Crane Manufacturer
Rating Charts
A durable, legible rating chart(s) from the manufacturer shall be provided in the cab of each crane. If the original chart(s) becomes illegible, a new chart(s) shall be obtained only from the crane manufacturer or designee. The crane’s serial number should be printed or stamped on the chart by the manufacturer or designee. The custodian shall ensure that the proper load chart(s) are available in the cab. The rating chart(s) shall be in a location accessible to the operator while the operator is at the controls.
Rating Chart Contents
The rating chart(s) shall include a full and complete range of manufacturer's crane load ratings at all stated operating radii, boom angles, work areas, and all stated boom lengths and configurations, jib lengths and angles (or offset). Also included shall be alternative ratings for use and nonuse of optional equipment on the crane, such as outriggers and extra counterweight, which affect ratings. Where ratings are limited by structural, hydraulic, or factors other than stability, the limitations shall be shown and emphasized on the rating charts.
Work Area Chart
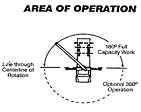
The manufacturer should and normally will provide a work area chart(s) showing the limiting position of any load within areas indicated (e.g., over side, over rear, over front). Work area configurations deviating from ASME B30.5, Figure 11, shall be defined by diagrams supplied by the crane manufacturer.
Operating Manual
An operating manual, supplied by the manufacturer, shall be readily available to the operator at all times.
Field Assembly, Disassembly, and Maintenance Information
The manufacturer shall furnish field assembly, disassembly, and maintenance information. (See Lattice Boom Dismantling/Assembly.)
Equipment Requirements
Wire Rope
For wire rope requirements, see Wire Rope.
Any new poured socket or swaged socket assembly used as a boom pendent shall be proof tested to the crane or fitting manufacturer’s recommendations, but in no case greater than 50% of the component wire rope’s or structural strand’s nominal strength.
Reeving Accessories
Wire rope clips shall be drop-forged steel of the single- or double-saddle type. Wire rope clips used in conjunction with wedge sockets shall be attached to the unloaded dead end of the rope only (see Figure 4). Eye splices shall be made in a manner recommended by the rope or crane manufacturer, and rope thimbles should be used in the eye.
Figure 4. Typical Wedge Sockets.
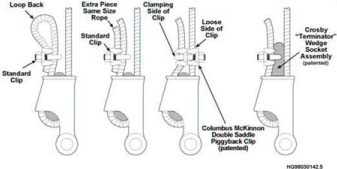
Notes: (a) It is important that wedge socket assemblies consist of a wedge and a socket, matched pair of the correct size, and from the same manufacturer. (b) Crosby® Group, Inc., now manufactures a patented wedge socket assembly that clips the rope to the wedge. This product may be found on new cranes and is suitable as a replacement part on existing cranes.
Tighten wire rope clips evenly to the recommended torque. Rope clip nuts should be periodically checked and tightened as necessary to compensate for any decrease in rope diameter during usage. Swaged, compressed, or wedge-socket fittings shall be applied as recommended by the rope, crane, or fitting manufacturer.
Sheaves
Sheave Grooves. Sheave grooves shall be smooth and free from surface defects that could cause rope damage. The cross-sectional radius at the bottom of the groove shall form a close-fitting saddle for the size of rope used.
Sheave Close-Fitting Guards. Sheaves carrying ropes, which can be momentarily unloaded, shall be provided with close-fitting guards or other devices to guide the rope back into the groove when the load is reapplied. The sheaves in the lower load block shall be equipped with close-fitting guards that will prevent ropes from becoming fouled when the block is lying on the ground with loose ropes.
Load Hook, Ball Assemblies, and Load Blocks
Load hooks, ball assemblies, and load blocks shall be of sufficient weight to overhaul the line from the highest hook position. Hook and ball assemblies and load blocks shall be labeled with their rated capacity and weight.
Hook Mousing and Throat Latches. Latch equipped hooks shall be used for hoisting and rigging operations unless the application makes use of the latch impractical or unsafe. The absence of a hook throat latch is not indiscriminately allowed. (See Hooks, specifically the section on Throat Latches.)
Booms and Jibs
Jib Restraint. Jibs shall be restrained from backward overturning. Cable-type belly slings are not acceptable for restraints.
Boom-Angle Indicator. A boom-angle indicator, readable from the operator’s station, shall be provided.
Boom-Length Indicator. A boom length indicator, readable from the operator’s station, shall be provided for telescoping booms unless the load rating is independent of the boom length.
Boom-Hoist Stop. A boom-hoist disconnect, shutoff, or hydraulic relief shall be provided to automatically stop the boom hoist when the boom reaches a predetermined high angle.
Boom and Jib Identification. Booms, boom sections, and jibs shall be clearly identified as to the crane(s) they are assigned.
Miscellaneous Equipment Requirements
Two-Blocking Features
Telescopic boom cranes manufactured after February 28, 1992, shall be equipped with an anti-two-block device or a two-block damage prevention feature for all points of two-blocking. Telescopic boom cranes manufactured before February 28, 1992, should be equipped with a two-block warning feature(s), a two-block damage prevention feature, or an anti-two-block device for all points of two-blocking (i.e., jibs, boom extensions, etc.).
Lattice boom cranes manufactured after February 28, 1992, shall be equipped with a two-block warning feature which functions for all points of two-blocking. Lattice boom cranes manufactured before February 28, 1992, should be equipped with a two-block warning feature which functions for all points of two-blocking.
Cranes used to lift suspended personnel platforms shall have an anti two-block device or a two-block damage prevention feature. A two-block warning feature and/or assigning a person to watch for, and guard against, two-blocking provides insufficient safety for personnel lifting and is not allowed.
Load Indicators. Cranes built after November 19, 1993, with a maximum load capacity of 3 tons or more should have load indicators.
Horn or Signal Device. An audible horn or signal device shall be provided. The control for the device shall be within reach of the operator.
Crane Levelness Indicator. Means shall be provided for the operator to visually determine the levelness of the crane.
Signs
Electrocution Hazards Warning Signs. Durable signs shall be installed, visible from the operator’s station, warning that electrocution or serious bodily injury may occur unless a minimum clearance of 10 feet (3 meters) is maintained between the crane or the load being handled and energized power lines up to 50 kV, and that greater clearances are required because of higher voltages. Refer to Table 1 and Figure 3.
Hand Signal Posting. It is required to conspicuously post at the job site figures demonstrating standard hand signals for controlling mobile cranes. Posting outside on the crane cab meets this requirement.
Posting hand signal charts outside on the crane cab is recommended and will meet the requirement to post hand signals conspicuously at the job site (see Special Signals).
Aviation Safety - High Boom. Within 3.5 miles (3 nautical miles) of an airport, crane booms configured 200 feet or more above ground level must have the prior approval of the DOE-RL Aviation Safety Officer. (See 14 CFR 77, Federal Aviation Administration.)
Seat Belt. If a seat belt is provided with a wheel-mounted, single-control station crane, it shall be used during transit and travel.
Equipment deficiencies found during operation or inspection that affect safety shall be resolved before
continued operation of the crane. Inspection requirements shall be derived from information provided by
the crane manufacturer. Unless there is a valid justification to do otherwise, the manufacturer’s
recommendations shall be followed. Inspection procedures shall be for the applicable make and model of crane.
Inspection requirements shall be derived from information provided by the crane manufacturer.
Unless there is a valid justification to do otherwise, the manufacturer’s recommendations shall
be followed. Inspection procedures shall be for the applicable make and model of crane.
Initial Inspection
Before initial use, new and altered cranes shall be inspected by a qualified inspector to ensure
compliance with requirements contained in the following documents:
- the purchase order (if applicable)
- provisions of this manual
- 29 CFR 1926.550, Cranes and Derricks.
Frequent Inspection
Frequent inspections shall be performed by the operator or an appointed person.
Frequent Inspection Procedure. The frequent inspection procedure shall be available to the operator. The frequent inspection procedure or an attachment thereto, shall state how deficiencies found during frequent inspection shall be reported.
Note:Frequent inspection procedures may be supplied by the manufacturer.
Frequent Inspection Steps. The following steps should be included in the frequent inspection procedure.
Recommended Daily, when used:
- Check the control mechanisms for maladjustment that may interfere with proper operation.
- Check safety devices and operator aids for proper operation (see Operator Aids).
- Inspect hydraulic hoses. Hoses that flex in normal operation of crane functions shall be visually inspected.
- Examine crane hooks and latches for deformation, chemical damage, cracks, and wear.
- Examine the hydraulic system for proper oil level.
- Visually inspect running ropes. A visual inspection shall consist of observation of the rope that can reasonably be expected to be in use during the day's operations. These visual observations should be concerned with discovering gross damage, such as the following, which may be an immediate hazard:
- rope distortion such as kinking, crushing, unstranding, birdcaging, main strand. displacement, or core protrusion (loss of rope diameter in a short rope length or unevenness of outer strands should provide evidence that the rope or ropes must be replaced).
- general corrosion.
- broken or cut strands.
- number and distribution of visible broken wires (see Wire Rope, for further guidance).
- Ensure inspections (wire rope and crane) are current via inspection sticker, other documentation or verbal confirmation from equipment custodian.
- Perform other inspections as recommended by the manufacturer.
Recommended Weekly:
- Check tires for recommended inflation pressure.
- Perform other weekly inspections as recommended by the manufacturer.
Recommended Monthly:
- Examine control mechanisms for excessive wear of components and contamination by lubricants or other foreign matter.
- Inspect rope reeving for compliance with crane manufacturer's specifications.
- If wire rope clips are used, check the tightness of the clip bolts and tighten if necessary.
- Examine electrical apparatus for proper operation, signs of excessive deterioration, dirt, and moisture accumulation.
- Check the lubricating systems for proper delivery of lubricant.
Perform other monthly inspections as recommended by the manufacturer. (Specific monthly inspections shall be documented [see Monthly Documented Inspections]).
Monthly Documented Inspections
Critical items in use such as brakes, crane hooks, ropes, hydraulic and pneumatic cylinders, and hydraulic and pneumatic relief pressure valves, shall be inspected monthly. See Hooks for hook inspection requirements and Wire Ropes for wire rope inspection requirements. Inspection records are required.
Operator Aids (Operator Aids are also called Crane Safety Accessories)
Operator aids including load indicating, anti-two-block, two-block warning, and two-block damage prevention systems shall be checked and inspected as follows:
- Before daily operation, a check by the operator or other designated person shall be made to ensure that the system is functional in accordance with the system manufacturer’s written instructions. This check is not required to be documented, but a checklist to verify inspection completion is recommended.
- The system shall be inspected and tested by a qualified person every 12 months, or more frequently, if specified by the manufacturer or required by a critical lift procedure. If calibration is required, it shall be done by a qualified person. This inspection and testing shall be documented.
Periodic Inspection
Periodic Inspection Frequency.Complete, documented inspections shall be performed monthly to no less than annually, depending upon crane activity, severity of service, and environment. Periodic inspection shall include the requirements of the frequent inspection and, in addition, items such as the following:
- deformed, cracked, or corroded members in the crane structure or boom
- loose bolts or rivets
- cracked or worn sheaves and drums
- worn, cracked, or distorted parts such as pins, bearings, shafts, gears, rollers, and locking devices
- excessive wear on brake and clutch system parts, linings, pawls, and ratchets
- load, boom angle, and other indicators over their full range, for any significant inaccuracies
- gasoline, diesel, electric, or other power plants for performance and compliance with safety requirements
- excessive wear of chain-drive sprockets and excessive chain stretch
- crane hooks for deformations or cracks (see Hooks for hook inspection requirements)
- travel steering, braking, and locking devices, for malfunction
- excessively worn or damaged tires
- hydraulic and pneumatic hose, fittings, and tubing inspection
- evidence of leakage at the surface of the flexible hose or its junction with the metal and couplings
- blistering or abnormal deformation of the outer covering of the hydraulic or pneumatic hose
- leakage at threaded or clamped joints that cannot be eliminated by normal tightening or recommended procedures
- evidence of excessive abrasion or scrubbing on the outer surface of a hose, rigid tube, or fitting. (In this event, means shall be taken to eliminate the interference of elements in contact or otherwise protect the components.)
- Hydraulic and pneumatic pumps and motors:
- loose bolts or fasteners
- leaks at joints between sections
- shaft seal leaks
- unusual noises or vibration
- loss of operating speed
- excessive heating of the fluid
- loss of pressure
- Hydraulic and pneumatic valves:
- cracks in valve housing
- improper return of spool to neutral position
- leaks at spools or joints
- sticking spools
- failure of relief valves to attain correct pressure setting
- relief valve pressures checked as specified by the manufacturer.
- Hydraulic and pneumatic cylinders:
- drifting caused by fluid leaking across the piston
- rod seals leakage
- leaks at welded joints
- scored, nicked, or dented cylinder rods
- dented case (barrel)
- loose or deformed rod eyes or connecting joints.
- Hydraulic filters:
- Evidence of rubber particles on the filter element may indicate hose, O ring, or other rubber component deterioration. Metal chips or pieces on the filter may indicate failure in pumps, motors, or cylinders. Further inspection will be necessary to determine the origin of the problem before corrective action can be taken.
Periodic inspections as recommended by the manufacturer.
Inspection of Cranes Not in Regular Use
A crane that has been idle for a period of more than 1 month, but less than 6 months, shall be given a complete frequent inspection and a documented inspection of hooks, wire ropes, running ropes, and standing ropes before returning to service. A crane that has been idle for a period of at least 6 months shall be given a complete periodic inspection and a periodic documented inspection of hooks, wire ropes, load lines, and standing lines.
Standby Cranes
Standby cranes shall be inspected at least semiannually in accordance with the requirements of a frequent inspection. Inspection of running and standing wire ropes shall be completed at least semiannually. Standby cranes that are exposed to adverse environmental conditions should be inspected more frequently.
Before Returning to Lift Service After Excavation or Demolition Work
Cranes used for excavation or demolition work shall be thoroughly inspected by a qualified inspector(s) before returning the crane to lift service. This inspection shall be documented and be at least equal to a periodic inspection with additional emphasis on equipment components susceptible to damage while the crane was in excavation or demolition service. Wire rope shall also be inspected before returning the crane to lift service (see Wire Rope).
Inspection Records
Required inspection records shall include the date of inspection, the signature of the person who performed the inspection and the serial number, or other identifier, of the crane that was inspected. Records (inspection and test reports) shall be retained in the crane maintenance file.
Frequent Inspection. Frequent inspection records are not required. It is recommended that a checklist, initialed by the operator, be used to record the completion of frequent inspections.
Monthly Inspection of Critical Items. Inspection records are required for monthly inspection of critical items such as brakes, hooks, ropes (load lines), hydraulic cylinders, and hydraulic and pneumatic pressure valves.
Inspection and Testing of Operator Aids. Except for before-use inspections, records documenting inspections and tests of operator aids are required. Operator aid systems shall be inspected and tested by a qualified person every 12 months, or more frequently if specified by the manufacturer.
Periodic Inspection. Periodic inspection records are required.
Inspection Before Returning to Lift Service. When a crane returns to lift service, inspection records are required.
Standby Crane Inspection Reports. Standby crane inspection records are required.
Hook Non-Destructive Examination (NDE) Reports. If hooks receive NDE, NDE inspection records are required.
Preventive Maintenance
A preventive maintenance program based on the crane manufacturer’s recommendations shall be established. Dated records shall be made available.
Replacement parts should be obtained from the original equipment manufacturer.
Maintenance Procedure
Before adjustments and repairs are started, the following precautions shall be taken as applicable:
- Place the crane where it will cause the least interference with other equipment or operations in the area.
- Set the controls in the off or neutral position and secure operating functions from inadvertent motion by brakes, pawls, or other means.
- Render the starting means inoperative.
- Stop or disconnect the power plant at the power takeoff.
- Lower the boom to the ground, if possible, or otherwise secure it against dropping.
- Lower the lower load block to the ground, or otherwise secure it against dropping.
- Relieve hydraulic oil pressure from hydraulic circuits before loosening or removing hydraulic components.
Place "Warning" or "Out of Order" signs on the crane controls. Signs or flags shall be removed only by authorized personnel.
After adjustments and repairs have been made, the crane shall not be returned to service until all guards have been reinstalled, trapped air removed from the hydraulic system, safety devices reactivated, and maintenance equipment removed.
Adjustments and Repairs
Any hazardous conditions disclosed by inspection or during operation shall be corrected before operation of the crane is resumed. Adjustments and repairs shall be done only by designated personnel.
Adjustments shall be maintained to ensure correct functioning of components. The following are examples:
- functional operating mechanisms
- safety devices
- control systems
- power plants
- braking systems.
Repairs or replacements shall be provided as needed for operation. The following are examples:
- critical parts or functional operating mechanisms that are cracked, broken, corroded, bent, or excessively worn
- critical parts of the crane structure that are cracked, bent, broken, or excessively corroded
- damaged or worn hooks, as described in Hooks. Onsite repairs by welding or reshaping are not allowed.
Replacement parts or repairs shall have at least the original design factor.
Instructions shall be provided by the manufacturer for the removal of air from hydraulic circuits.
Lubrication
Moving parts of the crane, for which lubrication is specified, shall be regularly lubricated. Lubricating systems should be checked for proper delivery of lubricant. Care shall be taken to follow the manufacturer’s recommendations as to the points and frequency of lubrication, maintenance of lubricant levels, and types of lubricant to be used.
Machinery shall be stationary while lubricants are being supplied and protection provided according to the Maintenance Procedure section above, unless equipped with for automatic or remote lubrication.
Testing
Operational Tests
Each production crane shall be tested by the manufacturer to the extent necessary to ensure compliance with the operational requirements of ASME B30.5, Mobile and Locomotive Cranes. (See B30.5-2.2.1, Operational Tests.)
Where the complete production crane is not supplied by one manufacturer, such tests shall be conducted at final assembly.
Operational crane test results shall be made available by the manufacturer or final assembler.
Rated Load Test
Before initial use, cranes in which load-sustaining parts have been altered, replaced, or repaired should be load tested by, or under the direction of, a qualified person. Load testing of altered, repaired, or modified cranes may be limited to the functions affected by the alteration, repair, or modification, as determined by a qualified person. The replacement of rope (load lines or static lines) is specifically excluded from this load-testing requirement. However, a functional test of the crane under a normal operating load should be made before putting the crane back in service.
- Test loads shall not exceed 110% of the manufacturer’s load rating.
- Written reports shall be furnished by an appointed or authorized person, and shall show test procedures and confirm the adequacy of repairs or alterations. Test reports shall be retained in the crane maintenance file.
Where re-rating is necessary:
- Crawler and wheel-mounted cranes shall be tested in accordance with ASME B30.5-1.1.(a) and 5-1.1.1.(c) for load ratings where stability governs. Ratings governed by structural competence shall be established by the manufacturer and tested to 110% of the rating.
- The re-rating test report shall be retained in the crane maintenance file.
No cranes shall be re-rated in excess of the original load ratings unless such rating changes are approved by the crane manufacturer or a qualified person.
Test Load Accuracy
The weight of the test loads used on site must be accurately known within a tolerance of +0% to -5%, traceable to a recognized standard or verified by engineering calculations.
Note:The Crane Load Stability Test Code, SAE J765, describes a test on new cranes done by the crane manufacturer or the manufacturer’s testing agency. This code requires a test weight accuracy of ~1%.
Crane Maintenance Files
The crane maintenance file is a compilation of various documents and records relating to operation, maintenance, inspection, testing, evaluating and repair of the equipment. The method(s) selected for establishing adequate information retention shall be determined by the equipment owner. It is expected that the maintenance files be retrievable within three work days. The equipment custodian is responsible for ensuring that a safe and reliable maintenance program is in place.
Intent of Crane Maintenance Files
The crane maintenance file shall contain, as a minimum, the required current dated periodic inspection records and other documentation to provide evidence of a safe and reliable maintenance program. Inspection records should be retained in a format and location that provides for ease in accessibility. Maintenance file information should provide a source for comparing present conditions with past conditions to determine whether existing conditions show a trending pattern of wear, deterioration, or other comparable factors that may compromise safe, continued use of the equipment. Length of record retention shall be determined by the equipment custodian’s established maintenance program.
Maintenance File Contents
Crane maintenance files shall contain the following documentation, as applicable, and should be retained for the life of the crane:
- monthly and periodic inspection records (the most recent records shall be retained in the file and the past records should be retained for trending)
- load test reports
- operational test reports
- documentation of altered, replaced, or repaired load-sustaining parts
- records of special inspections on safety-related items such as brakes, crane hooks, ropes, hydraulic and pneumatic cylinders, and hydraulic and pneumatic relief pressure valves
- copies of waivers, exemptions, hostile environment plans, or similar documentation applicable to the crane (to include manufacturer's safety bulletins, safety alerts, and product recall information)
- documentation for replacement ropes (see Wire Rope)
- wire rope manufacturer’s certification for replacement ropes
- records of inspection on load indicating devices, anti-two block, two-block warning, and two-block damage prevention systems.
Previously Owned Cranes Maintenance Files
Although complete maintenance information for previously owned cranes may not be available, the equipment custodian shall acquire as much of the pertinent information as possible. If efforts fail to obtain the required information, the following actions, at a minimum, must take place:
- Perform a periodic inspection by a qualified inspector, including inspection of hooks and wire ropes.
- Inspect for evidence of past repairs, alterations, or modifications. Note the results of this inspection on the inspection report.
- Resolve deficiencies noted by the inspector before placing the crane into service. Perform repairs and retests as needed.
If there is evidence of past repairs, replacement, or alterations of load-bearing parts and load test records are unavailable, a load test shall be performed in accordance with Rated Load Test, above.
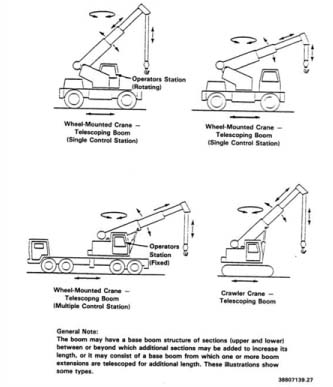
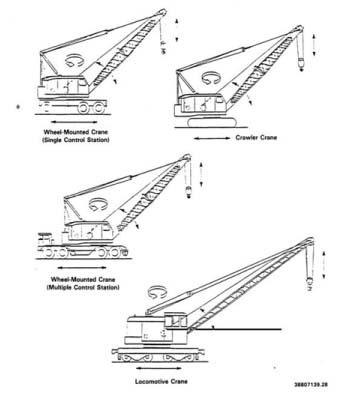
Mobile Crane Types (1 of 3)
What should you check for before operating a crane?
- Rope appearance - lubrication, kinks, breaks, corrosion, reduced diameter, or other signs of wear or damage.
- A rope drum - position of cable in groove tracking, means of anchoring and drum wear or damage.
- Sheaves - alignment of ropes, guides, dead ends, wear in sheave groove.
- Hooks - cracks, twisting, straightening, hook throat opening or other signs of wear or damage.
- Lights - burned out, broken.
- Mechanical parts and guards - loose, bent, broken, and missing.
- Rails - broken, chipped, cracked.
- Wheels - worn (showed by bumpy riding).
- Bearings - loose, worn.
- Brakes - shoe wear.
- Bridge bumpers and a trolley end stop - loose, missing, improper placement.
- Controllers and collector shoes or bars - worn, pitted, loose, broken, or faulty operation.
- A foot walk - condition of the boards, railings, and ladders.
- Gears - lack of lubrication or foreign material in gear teeth (indicated by grinding or squealing).
- A fire extinguisher must be in the crane cab.
- Make sure that no one is on or around a crane before closing the main or emergency switch, even when starting on regular duty.
- Before closing the main switch, make sure that all controllers are in the "off" position.
- Inspect oil only after opening and locking out the main switch.
What should you inspect a moving crane for?
Before lifting any load you should start the crane and inspect it when it is moving
- Smooth play out of wire rope to and from a drum.
- Sheaves turning without binding or jerking as a rope passes over them.
- Proper alignment where ropes enter sheaves.
- Ropes not rubbing on rope sheave guards.
- Rubbing, scraping, or clattering noises during operation.
- Proper operation of controls and brakes.
- Test the limit switch. Slowly raise the hook block with no load attached to the hook. If the switch is defective, make sure the block does not strike the cable drum.
What should you check for when inspecting a crane before maintenance?
- Lower hoist to unload rope sheaves.
- Unwind all wire rope from the hoist drum to expose all parts of a rope, making sure that the rope does not rewind in the reverse direction.
- Inspect sheaves, sockets, dead-ends, thimble joints, and all wire rope hardware.
- During rope changes, check the sheaves for worn bearings, broken flanges, proper groove size, smoothness, and contour.
- Inspect all parts of the cable, cleaning wire rope only as required to complete an inspection. Excessive removal of lubrication will lead to damage.
- Re-lubricate rope to prevent corrosion, wear, friction, and drying out of the core.
- Check for ropes that may have been operated dry (unlubricated). Replace dry ropes. There may be hidden damage that is not detected by visual inspection.
- Compare the rope length and diameter with the original dimensions. Lengthening accompanied by diameter reduction is often an indication of interior core defects.
- Visually examine the crane structure for deformed, cracked or corroded members in the structure and boom. Check for loose bolts or rivets. Check for excessive wear on brake and clutch system parts.
- Check for deterioration or leakage in air or hydraulic systems.
- Check all control mechanisms for poor adjustment or excessive wear.
- Check accuracy of marking on the load/radius indicator over full range.
- Establish a schedule of rope replacement to change wire rope before it breaks. Periodic replacements do not take the place of inspections. If rope breaks or inspections reveal abnormal wire breakage or defects, reduce the time between replacement. Do not make wire rope slings from used wire rope.
What are some things to remember when repairing a crane?
- Take a crane to a location where repairs will least interfere with other cranes.
- Ensure that all controllers are placed in the "off" position, and the main switches are open and locked.
- Place on the switch a standard warning tag stating "DO NOT START." The tag must be filled out and signed
- Place rail stops or make other safety provisions when another crane operates on the same runway.
- Use fall protection equipment.
- Do not carry anything in your hands when going up and down ladders. Items that are too large to go into pockets or belts should be lifted to or lowered from the crane by a rope.
- Prevent loose parts or tools from falling to the floor.
- The area below the crane must be cleared and a barrier erected to prevent injury from a falling object.
- Replace all guards and other safety devices before leaving a crane.
- Remove all stops, tools, loose parts and other material and dispose of them before completing the repair job.
- Enter all service inspections and repairs in a crane log book or file.
How should you use a vertical hitch?
- In most cases use more than one sling. A single rope sling load tends to rotate in a twisting action that unwinds cables causing them to weaken.
- Do not use for lifting loose materials, long or unbalanced loads. How should you use a turning hitch?
- Use a doubled choker to turn loads.
- Place both sling eyes on top of the load pointing in the direction opposite to the direction of the turn. This sling will remain tight while the load is turning.
- Never use a basket hitch to turn a load. How should you use choker hitches?
Choker hitch
- The sling tightens on a load as it is lifted.
- Do not use on loose bundles.
- Use choker hitches at 75% or less of rated sling capacity.
Doubled choker hitch
- Provides more contact area to secure a load.
Double Wrap Choker Hitch
- This hitch compresses the load and prevents it from slipping out of the sling.
- Where overhead space is limited, a double wrapped choker hitch is acceptable. How should you use basket hitches?
Basket hitches
- Provide relatively good control and eliminate the tendency of the load to twist, compared with a vertical hitch.
- Do not use on a load that is difficult to balance.
Double basket hitches
- Balance loads by keeping slings apart.
- Prevent sling slippage by keeping the angle between the load and sling 60° or more.
Double Wrap Basket Hitches
- Provide more contact for handling loose material and pipe.
- Tend to draw the load together. How should you use bridle hitches?
Bridle hitches
- Are made of 2, 3 or 4 single leg hitches.
- Are used for hoisting an object that has lifting lugs or attachments.
- Position the hook over the center of gravity of the load.
- Adjust sling leg lengths with turnbuckles to level raised load.
- Check each sling leg angle to ensure sling is not overloaded. How does the angle of hoisting affects a sling load limit?
- The angle affects the working load limit. The smaller the angle, the less load a sling can carry.
What should you know about using synthetic web slings?
- Synthetic web slings are easily cut and have poor abrasion resistance when compared with chain and wire rope slings.
- Nylon slings are damaged by acids, but resist caustics.
- Polyester slings are damaged by caustics but resist acids.
- Sunlight, moisture, and temperatures above 90°C (194°F) damage both nylon and polyester slings.
- Use slings made of the right material for the job.
- Check the manufacturers' slings for their code number and the rated capacity. Reference charts showing slings and hitch rated capacities are available from manufacturers.
- Inspect slings before using them.
- Keep an inspection record for each sling.
What should you check when selecting slings?
- Refer to the manufacturer's reference chart for the capacity rating.
- Check a sling before using it.
- Determine the weight of the load.
- Prevent loading more than the rated capacity by considering sling angle.
- Protect webbing from sharp corners, protrusions, or abrasive surfaces.
- Ensure that the sling choking action is on the webbing, not the hardware.
- Have slings repaired by a sling manufacturer only.
What should you avoid when using slings?
- Do not drag slings across floors or other abrasive surfaces.
- Do not drop slings with metal fittings.
- Do not set loads down on top of slings.
- Do not pull slings from under loads when the load is resting on the sling.
- Do not weld anything hung from a sling.
- Do not lengthen or shorten slings by tying knots.
- Do not place stitch patterns (laps) on hooks, around sharp corners, or at choker bearing points.
What kinds of damage make a synthetic web-sling unusable?
- Increased stiffness of sling material.
- Acid or caustic burns.
- Melted, burned or weld spatter damage.
- Holes, tears, cuts, snag.
- Broke or worn stitching.
- Excessive abrasive wear.
- Knots in any part of the sling.
- Crushed webbing or embedded particles.
- Bleached sling color.
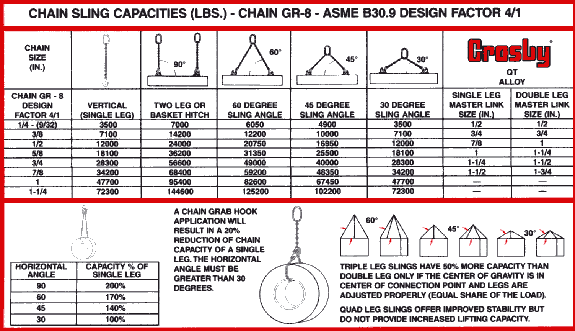
When should you inspect chain slings?
- Inspect chain slings every working day. Check for visible faults in links and hooks.
How should you check chain slings during the periodical inspection?
A competent person should inspect chain slings periodically, according
to the manufacturer's recommendations. For record keeping purposes
it is useful if each chain has a metal tag with an identification
number and load limit information. Change length, other characteristics and an
inspection schedule should be recorded in a log book.
- Clean sling before inspection.
- Hang the chain up or stretch the chain out on a level floor in a well-lighted area. Remove all twists. Measure the sling length. Discard if a sling has been stretched.
- Make a link-by-link inspection and discard if:
- a. Wear exceeds 15% of a link diameter.
- b. Cut, nicked, cracked, gouged, burned, or corrosion pitted
- c. Twisted or bent.
- d. Stretched. Links tend to close up and get longer.
- Check master link, load pins and hooks for any of the above faults. Hooks should be removed from service if they have been opened more than 15% of the normal throat opening, measured at the narrowest point, or twisted more than 10° from the plane of the unbent hook.
- Manufacturers' reference charts show sling and hitch capacities. Record manufacturer, type, load limit and inspection dates.
How should you use chain slings safely?
- Find out load weight before lifting.
- Lower working a load limit if there may be severe impact.
- Balance the load to avoid overstress on one sling arm or he load slipping free.
- Pad sharp corners to prevent bending links.
- Replace broken safety latches.
- Reduce the load limit when using chain in temperatures above 425°C (800°F).
- Keep hands and fingers from between load and chain.
- Store chain sling arms on racks in assigned areas.
What should you avoid using chain slings?
- Avoid impact loading: do not jerk the load when lifting or lowering the sling. This increases the actual stress on the sling.
- Do not drag chains.
- Do not splice a chain by inserting a bolt between two links.
- Do not shorten a chain with knots or by twisting.
- Do not force a hook over a link.
- Do not use homemade connections. Use only attachments designed for the chain.
- Do not heat treat or weld chain links: the lifting capacity will be reduced drastically.
How should you select the proper wire rope sling?
- Follow the manufacturers' charts and tables on sling types, angles, and rope diameters.
- Follow the manufacturers' recommendations on clips and clamps of suitable size and design for ropes of different size.
- Attach using methods outlined by the manufacturer.
- Remember that a socket and clip fittings used to attach the rope determine the sling's load limit. Fittings have 75% to 100% of the breaking load of the rope.
- Remember that the safe load limit of a sling also depends on the hitch (method of applying a sling to the load). The type of hitch depends on the kind of material to be lifted, the safe load limit of the sling, the presence (or absence) of lugs on the load, the headroom, and other factors. Check with the manufacturers instructions.
How should you use wire rope slings safely?
- Use wire rope slings at rated limits.
- Examine slings for wear, fatigue, crushed or broken wires, kinking, ballooning or "bird-caging", heat damage, etc. Check both before and after using slings to detect any damage or defects.
- Inspect and tighten fittings regularly.
- Check the manufacturer's chart for sling properties.
- Reduce rope stress with slow starts and stops.
- Keep wire rope slings well lubricated and inspect them often.
- Remove damaged slings from service and tag appropriately.
- Store slings on racks in a clean, dry place.
Center the sling load to prevent the load from shifting suddenly and causing a high impact load.
What should you avoid when using wire rope slings?
- Do not bend slings around sharp edges. Protect them by using corner saddles, padding, or wood blocks.
- Do not use slings with knots.
- Do not slide the load along a rope.
- Do not use a single leg hitch on a load that cannot be controlled. Rotation of a load can undo the wire rope strands and weaken the rope.

Who should inspect wire ropes and when?
- Only trained personnel should carry out an inspection of wire ropes.
- Inspect a wire rope when installing it.
- Inspect wire ropes every working day.
- Keep records of daily inspections.
- Check for abrasions, corrosion, pitting, and lubrication inside rope. Insert a marlin spike beneath two strands and rotate to lift strands and open rope.
When should you eliminate the rope from its use?
Assess the condition of the rope at the section showing the most wear. Discard a wire rope if you find any of the following conditions:
- In running ropes (wound on drums or passed over sheaves), 6 or more broken wires in one lay length; 3 or more broken wires in one strand in one lay.
- In pendant standing ropes, 3 or more broken wires in one lay length.
- Wear of 1/3 of the original diameter of individual outside wires.
- Kinking, crushing, cutting or unstranding, bird caging or other physical damaged that has distorted the shape of the wire rope.
- Heat damage (check for burn marks, discoloration of the metal).
- Excessive stretch or sharp reduction in the rope diameter.
- Knots or splices (except eye splices) in a wire rope.
What can cause a wire rope break?
- Wear on areas in contact with hoist sheaves and drums.
- Corrosion from lack of lubrication and exposure to heat or moisture (e.g., wire rope shows signs of pitting). A fibre core rope will dry out and break at temperatures above 120°C (250°F).
- Fatigue from repeated bending even under normal operating conditions.
- Overloading the safe working load limit. Follow manufacturers' charts.
- Mechanical abuse - crushing, cutting or dragging of rope.
- Kinks from improper installation of new rope, sudden release of a load or knots made to shorten a rope. A kink cannot be removed without creating a weak section. Discarding kinked rope is best.
What are the types of shackles that you can choose?
- Anchor (bow type) and chain ("D" type) shackles are used with screw or round pins.
- When selecting the right shackle, refer to manufacturers' tables for the safe working loads of the shackles.
- Shackles are sized according to the diameter of the bow section rather than the pin size. Never use a shackle if the distance between the eyes is greater than listed in the manufacturers' tables.
How should you inspect shackles?
- All pins must be straight and all screw pins must be completely seated. Cotter pins must be used with all round pin shackles.
- Replace shackles worn in the crown or the pin by more than 10% of the original diameter.
What should you avoid when using shackles?
- Do not replace the shackle pin with a bolt. A load will bend the bolt.
- Do not allow a shackle to be pulled at an angle. The legs will open. Pack the pin with washers to center the shackle.
- Do not use screw pin shackles if the pin can roll and unscrew. If the load shifts, the sling will unscrew the shackle pin.
How should you sling a load onto a crane hook?
- Make clear signals according to standard signals. Refer to "Materials Handling - Crane and Hoist Hand Signals" for examples.
- Signal the crane operator from only the one slinger who is in charge of lift. The only exception is a stop signal. (A slinger or rigger is the person who hooks loads onto cranes using various types of slings.)
- Determine the weight of the load to be lifted.
- Select the right sling for each job using the manufacturers' tables. A slinger must be familiar with these tables showing the safe capacities of slings.
- Inspect each item of lifting equipment before and after lifts.
- Protect slings from damage by sharp edges with corner saddles, padding, or wooden blocks.
- Warn all people out of the load area before starting the lift.
- Protect your hands and fingers: when slack is being taken out of a sling, keep them from between the sling and load so they will not be trapped and crushed. Step away before the lift is made.
- Make sure a load is high enough to clear all objects before signaling for the crane to move.
- Walk ahead of the moving load and warn people to keep clear. Use guide ropes to prevent rotation or other uncontrolled motion.
- Hook unused sling legs to the sling ring.
What should you avoid when slinging a load?
- Do not exceed the capacities of slings, fixtures and cranes.
- Do not twist or tie knots in slings or use bolts, nails or pieces of wire to shorten slings.
- Do not splice together broken slings.
- Do not ride on hooks or loads.
- Do not allow workers to walk or work under a load.
- Do not attempt to pull or push loads to a spot that is not under the hoist.
- Do not drag slings. Avoid pulling slings out from under loads by crane. Set down loads on blocking, never directly on a sling.
- Do not leave unused slings, accessories, or blocking lying on the floor. Hang on racks or store in a proper place.
- Do not carry a load by inserting the point of the hook into a link of the chain.
- Do not hammer a sling into place.
- Do not leave loose materials on a load.
- Do not use slings that are stretched, broken, or defective. Tag them as defective and dispose of any damaged slings.
- Do not leave suspended loads unattended.
How should you select the right bolt?
- Use plain or shoulderless eye bolts or ring bolts for vertical loading only. Angle loading on shouderless bolts will bend or break them.
- Use shoulder eye bolts for vertical or angle loading.
How should you use eye bolts safely?
- Orient the eye bolt in line with the slings. If the load is applied sideways, the eye bolt may bend.
- Pack washers between the shoulder and the load surface to ensure that the eye bolt firmly contacts the surface. Ensure that the nut is properly torqued.
- Engage at least 90% of threads in receiving a hole when using shims or washers.
- Attach only one sling leg to each eye bolt.
- Inspect and clean the eye bolt threads and the hole.
- Screw the eye bolt on all the way down and properly seat.
- Ensure the tapped hole for a screw eye bolt (body bolts) has a minimum depth of one-and-a-half times the bolt diameter.
- Install the shoulder at right angles to the axis of the hole. The shoulder should be in full contact with the surface of the object being lifted.
What should you avoid when using eye bolts?
- Do not run a sling through a pair of eye bolts: this will reduce the effective angle of lift and will put more strain on the rigging.
- Do not use eye bolts that have been ground, machined or stamped.
- Do not paint an eye bolt. The paint could cover up flaws.
- Do not use eye bolts that have worn threads or other flaws.
- Do not insert the point of a hook in an eye bolt. Use a shackle.
How should you inspect the body of a clamp?
- Follow the clamp manufacturer's maintenance recommendations.
- Inspect internal and external surfaces for forging or weld fractures, wear and distortion.
- Check all pin holes for wear.
- Inspect the throat (clamp opening) width. At zero grip, the cam should be in full contact with the pad.
- Measure the width of the throat. If the measurement at the base, where the pad is located is greater than at the top, the body has been overloaded. Replace the clamp; tag the defective clamp and remove it from service. How should you inspect the internal parts of the clamp?
- Soak overnight in a degreasing solvent to remove all dirt and grease that prevent proper inspection of components. Degreasing solvents should be used in appropriately well ventilated areas. Handle the wet clamp parts while wearing gloves made of material that is chemically resistant to the solvent.
- Remove the body pins or bolts and slide out the complete internal mechanism.
- Check each body pin or bolt for wear or bending due to overloading.
- Check each spacer, rivet, bolt or internal part for play or wear.
What should you know about the spring, cam, lock and pads?
- The cam spring should be strong enough to hold the cam against the pad.
- The locking spring should give initial pressure at near zero grip without material in the clamp.
- There should be "definite tension" in the locked position.
- The spring should not be bent or distorted.
- The lock assembly should rotate freely without binding and must rest fully on the stop pin.
- Cams and pads are vital parts of a clamp and are exposed to wear. Use on one size plate thickness will cause wear only in one area of the cam working surface. Replacement is required sooner than when a cam is used to handle different plate thicknesses.
- Examine the cam surface. If the teeth are flattened by 50% or more, replace the cam and pad.
- Teeth must be sharp and free of foreign material.
How should you use plate clamps safely?
- Refer to the manufacturers' operating instructions.
- Inspect clamps visually before each lift.
- Use the correct clamp for a job.
- Use two or more clamps to balance a long or flexible load.
- When using a vertical type of plate clamp, use a locking device to prevent accidental loosening.
- Use horizontal types of plate clamps in pairs.
- Use clamps within their rated capacity and flange width.
- Lock a clamp closed before lifting a load.
- Use a sling between the clamp and the crane or hoist hook.
What should you avoid when using plate clamps?
- Do not lift over workers.
- Do not stand near a load. Position yourself away from and fully clear of the load.
- Do not lift from the side with a vertical clamp.
- Do not lift more than one plate at a time with a vertical clamp.
- Do not lift plate from the bottom of a plate stack.
- Do not grind, weld or modify a clamp.
- Do not use a clamp having a minimum jaw opening larger than the thickness of the load.
- Do not leave suspended loads unattended.
Follow ANSI Guidelines
Train workers to follow ANSI guidelines for operating cranes near overhead power lines (ANSI Standard B30.5-1994, 5-3.4.5)[ANSI 1994]. These guidelines recommend posting signs at the operator's station and on the outside of the crane warning that electrocution may occur if workers do not maintain safe minimum clearance that equals or exceeds OSHA requirements as follows:
--------------------------------------------------------------------------------
Power line voltage Minimum safe
phase to phase (kV) clearance (feet)
--------------------------------------------------------------------------------
|
50 or below 10 Above 50 to 200 15 Above 200 to 350 20 Above 350 to 500 25 Above 500 to 750 35 Above 750 to 1,000 45 |

|
Crane Certification & Training School